| 01
The main cause of failure for this wood gutter was not its lacking maintenance put its poor installation. This is not the original gutter to this building. I'd say it was replaced in the late 80's or early 90's. For some reason the installers thought they had a better idea than the original builders and did it their way. |
|
| 02
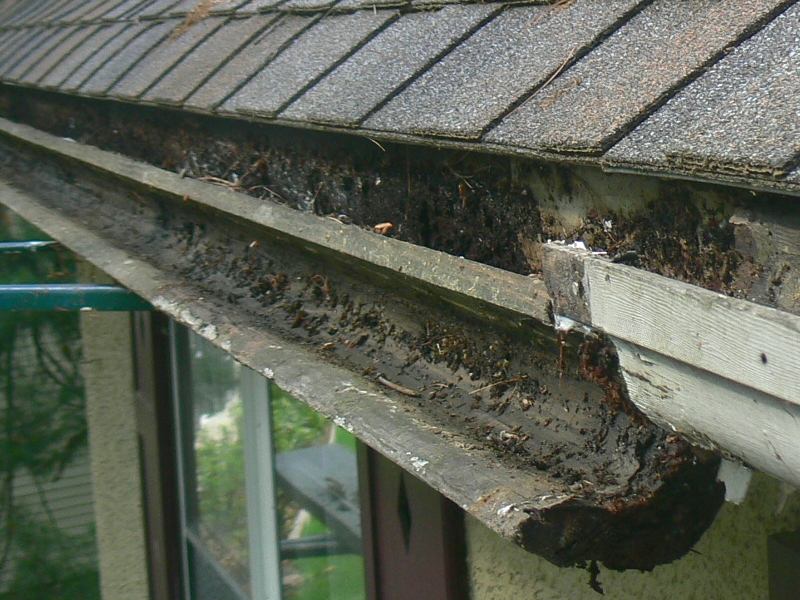
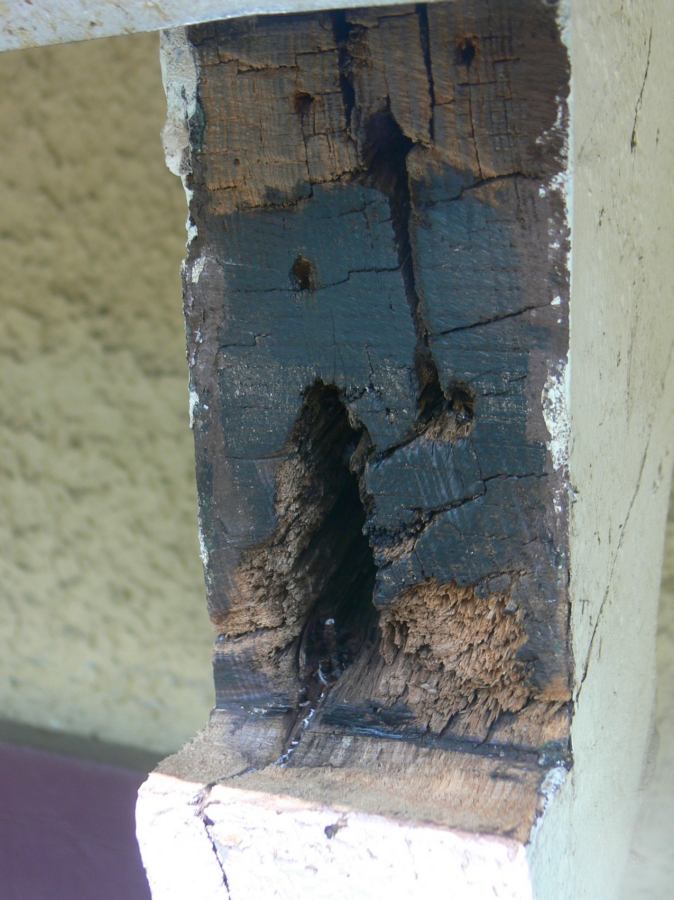
Click on this photo to really see whats going on here. Notice how the inside of the gutter is in fine shape. The problem is the installers did not cap the back of the gutter which has always been done since before they were born. And two, this eave never was designed to have a fascia yet these installers just couldn't imagine the original builders left it out. |
|
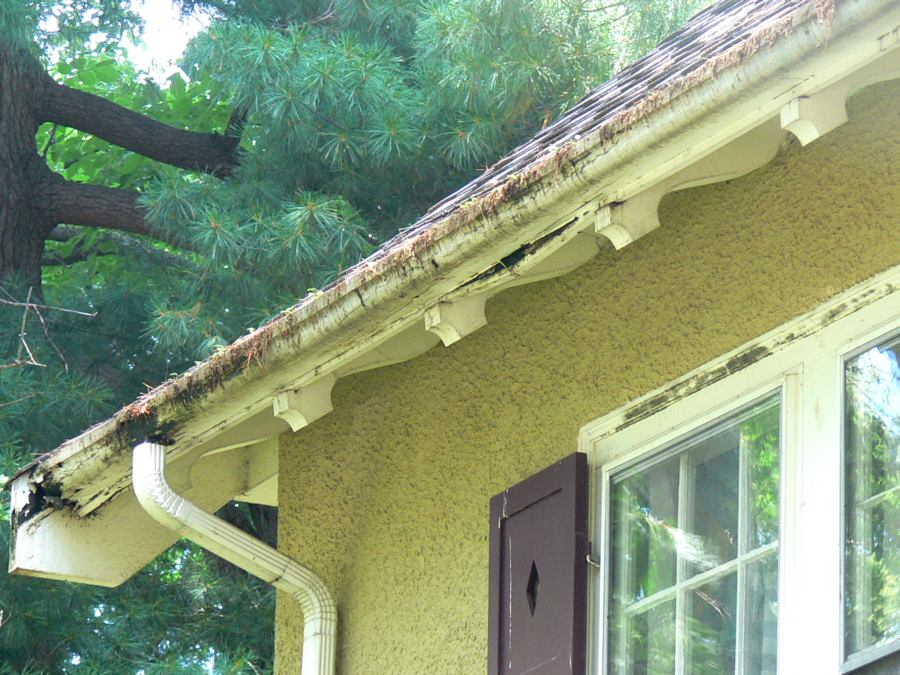
| 03
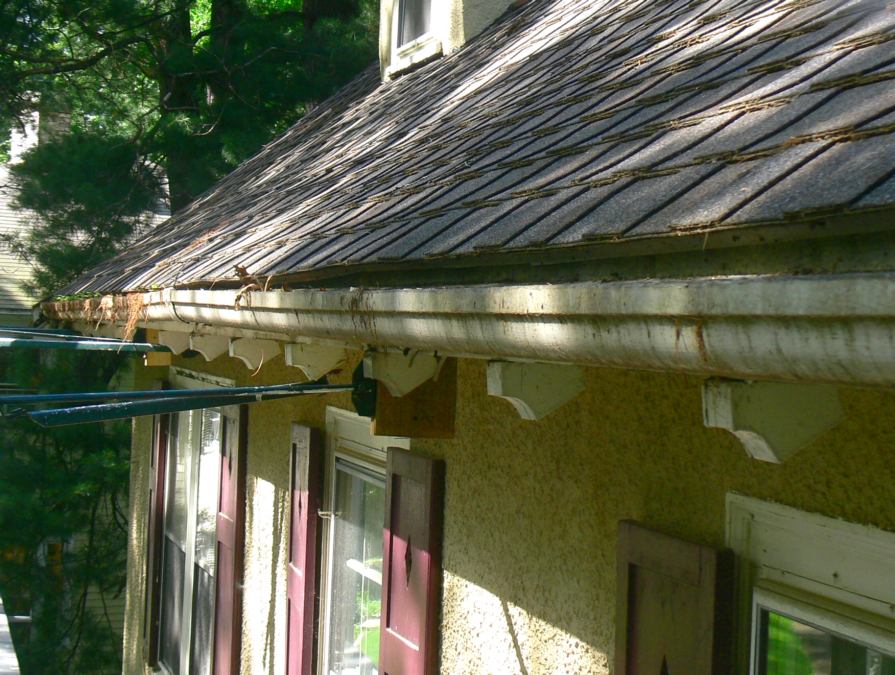
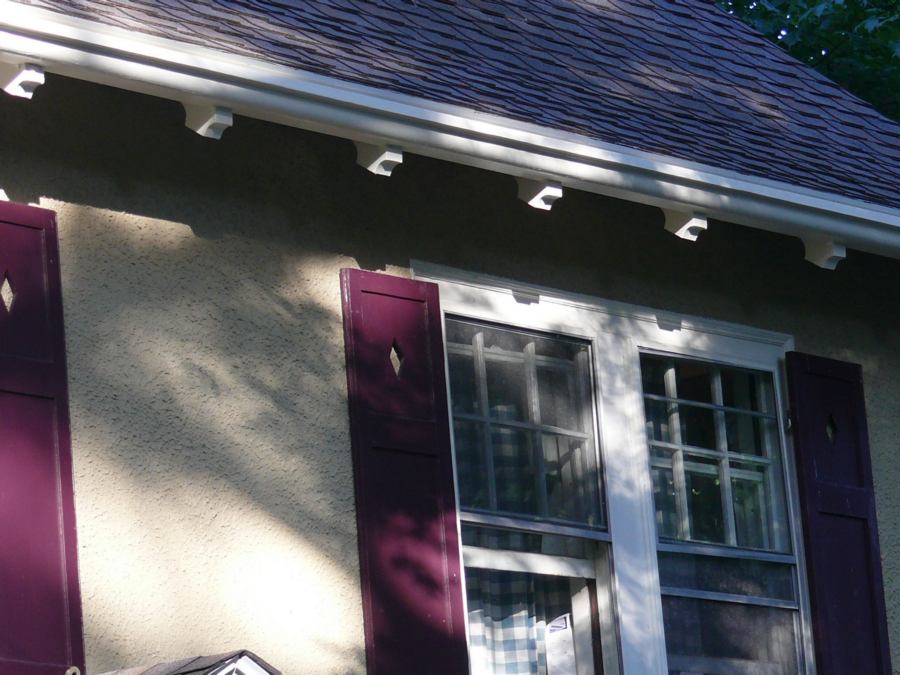
The original gutter rested on the decorative rafter tails. That would have made the gutter nice and straight, the way it was meant to be installed. If you can see a gutters pitch from the ground, it's too much. Many installers are brainwashed into believing that gutters will not drain without pitch. Notice how excessively this gutter was pushed up in the center of the span. Look at any house built before the 1930's with original gutters. There are many wood gutters well over 100 years old that are still in excellent condition. What you'll notice is nothing, ie the gutter will look straight and level with the cornice. If it wasn't it would jump out at the observer like a tilted painting. |
|
| 04
Over pitched gutters hold less water and overflow at the low ends during moderate to heavy rains. Shoving the water to the leaders faster than they can drain is a bad idea. Plumbers need pitch to slurry the waste. Moving debris in gutters to the leaders creates unwanted blockage. Pitched gutters hold less water too. Adding more water to an over pitched gutter just causes it to overflow at the low end. A dead level gutter will drain because the surface tension of water will keep the flow toward the leader going. The small amount of water remaining after the rain stops will just evaporate. |
|
| 05
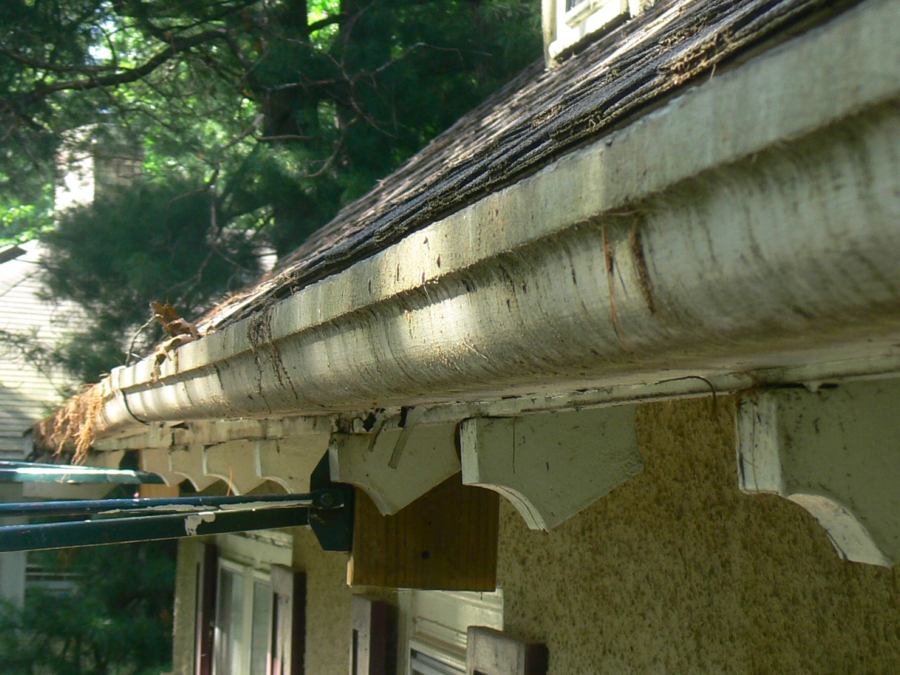
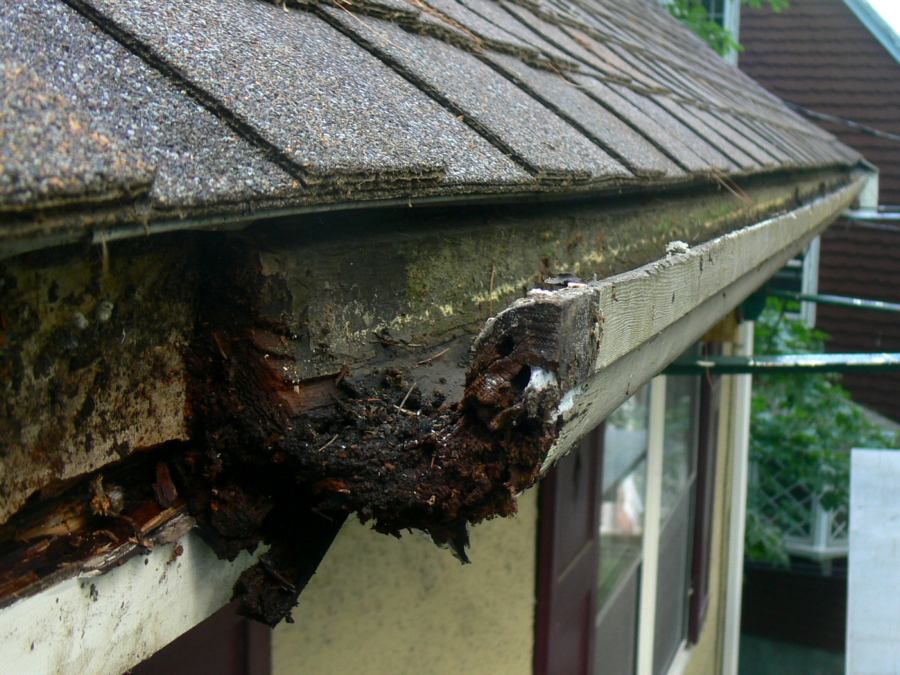
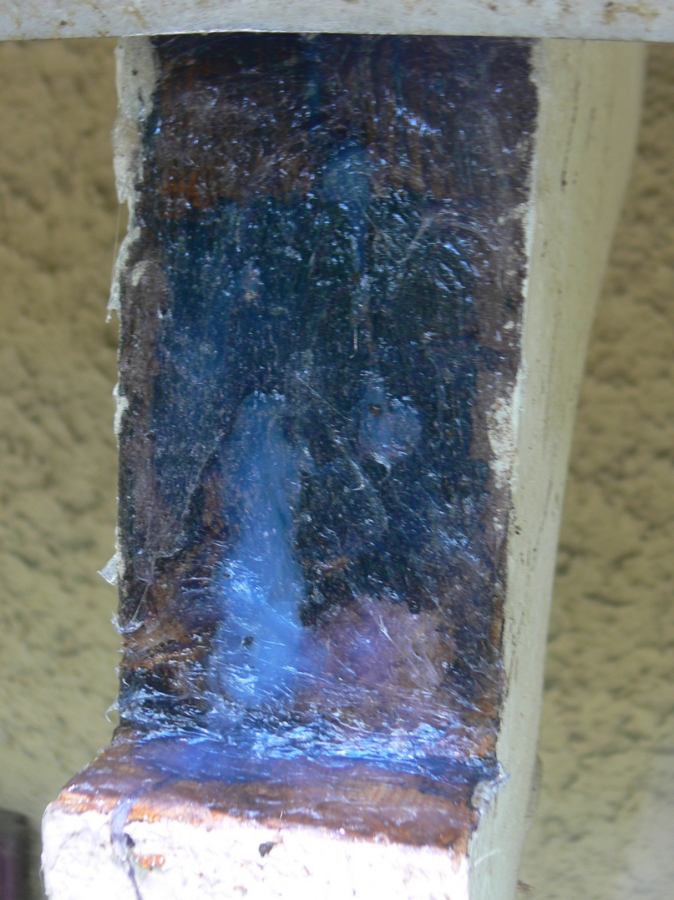
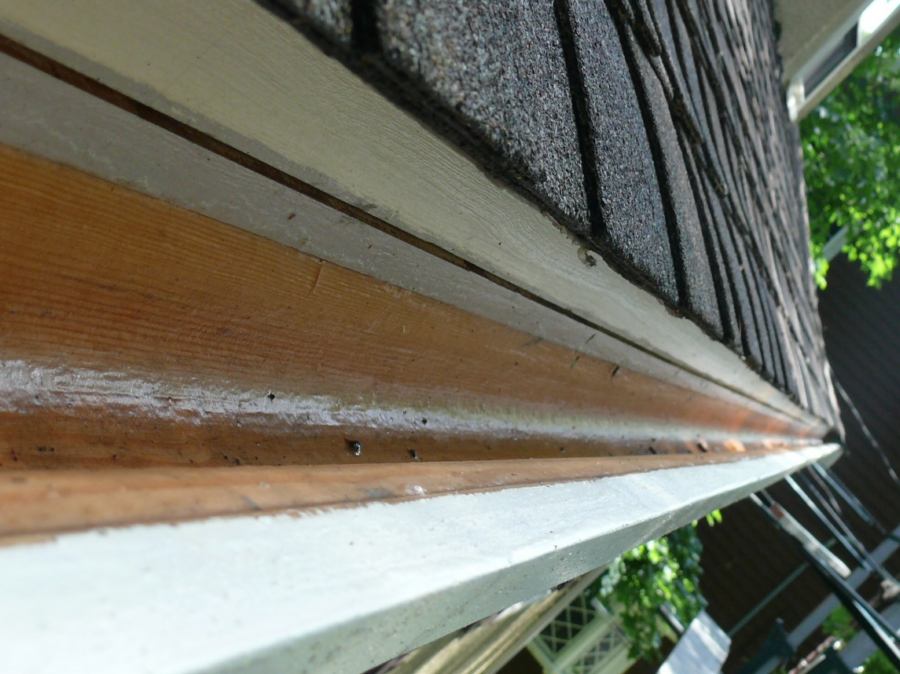
Notice the nice straight line on the back of this wooden gutter, that's the level water line. This mark was made from this spring's floating tree pollen. Visual evidence of how the amount of water this gutter can hold was drastically reduced by over pitching it. You can't add any more water, that pollen line indicates the full line. End grain sucks up water like a straw. If its not sealed or allowed to air dry, it will rot. These installers should have made this joint tight or used a full length gutter. |
|
| 06
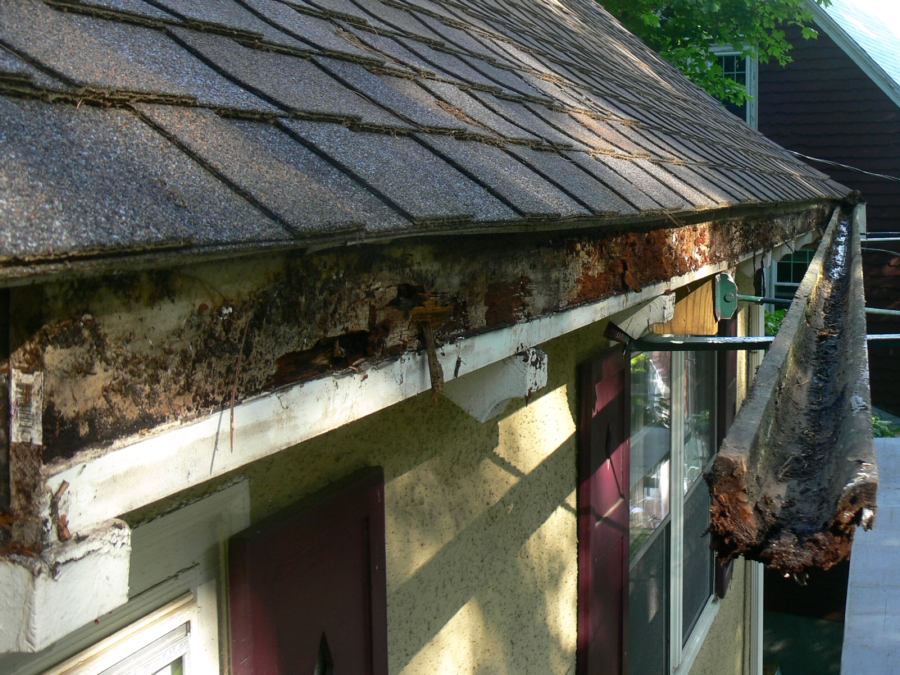
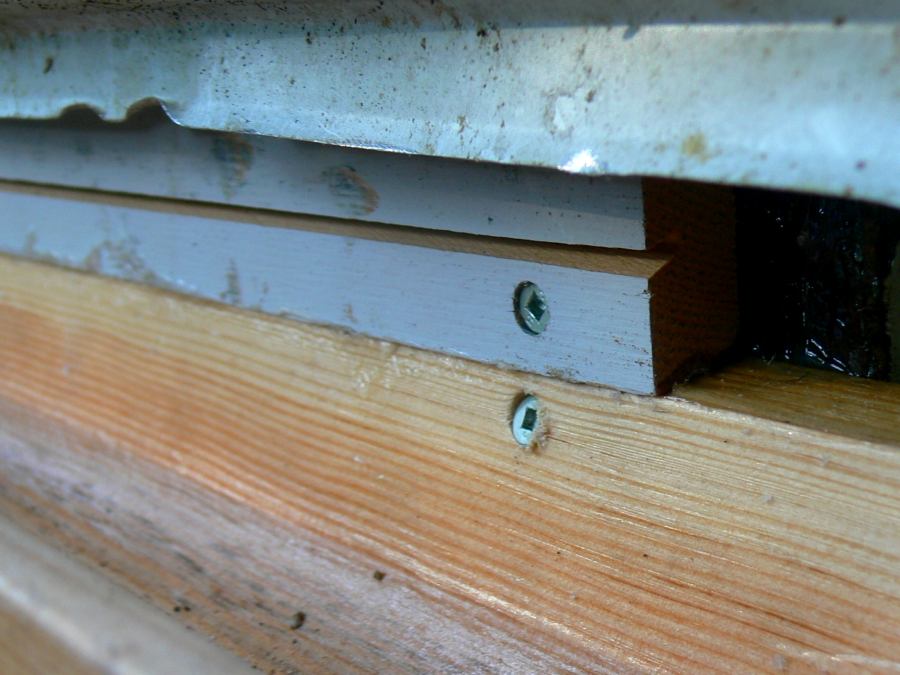
So the middle 20' of this 41' wooden gutter was robbed of its carrying capacity by over pitching it. A pitch of no more than 1" over 40 feet is recommended. That translates to a 1/4" or less over 10 feet. And these installers pitched this gutter an excessive 2" over 20 feet. As you'll see further down, roof run-off followed the metal drip edge and was directed to the back of the gutter where it became trapped. The back of this fir gutter is not as badly rotted as this pre-primed pine fascia, but its bad enough not to be reused. Again, it was the ill-fated installation and not the gutter itself as to why it needs replacing. |
|
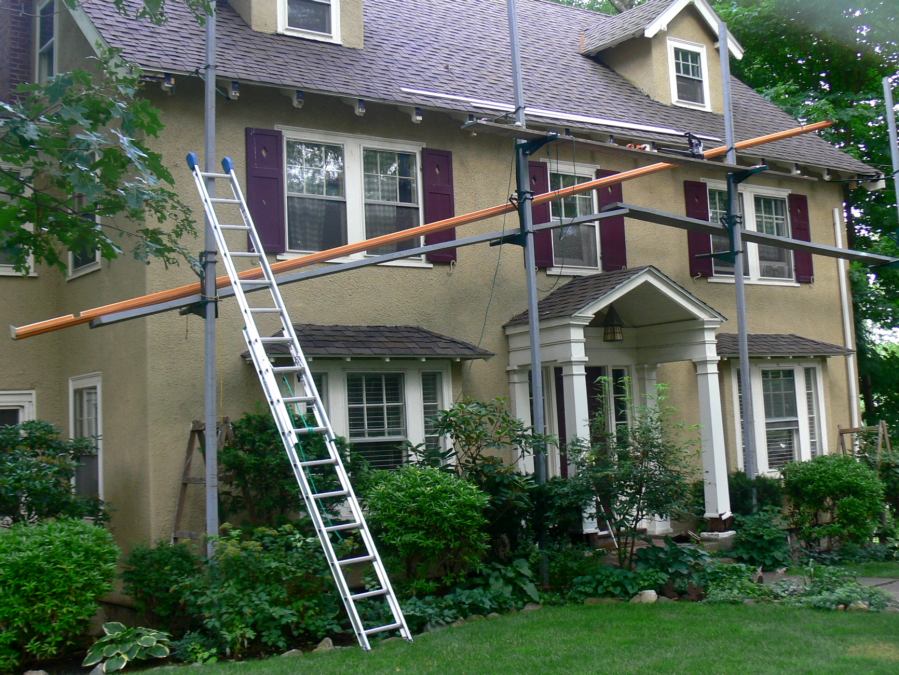
| 07
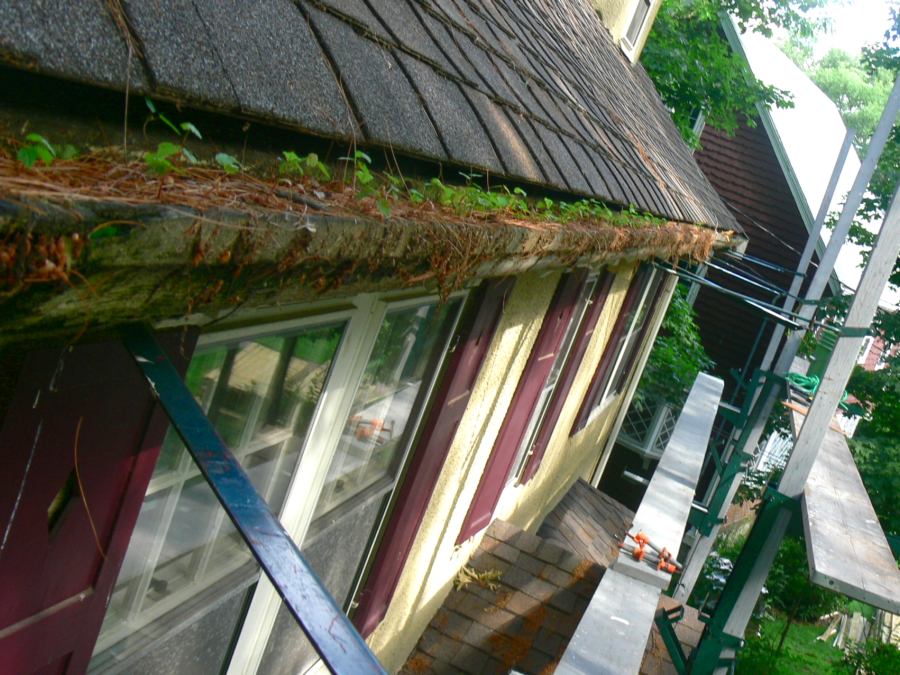
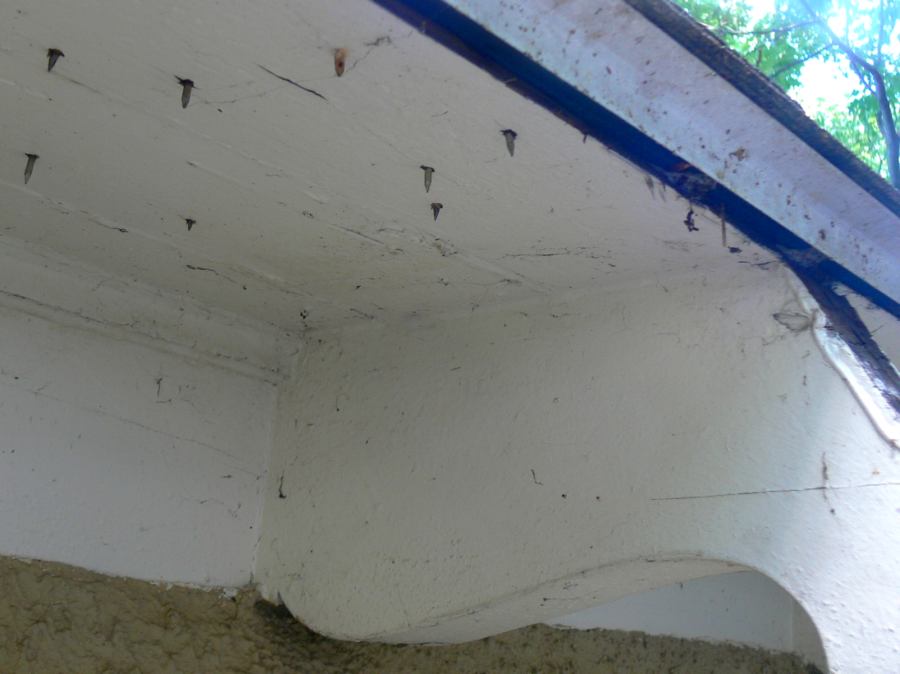
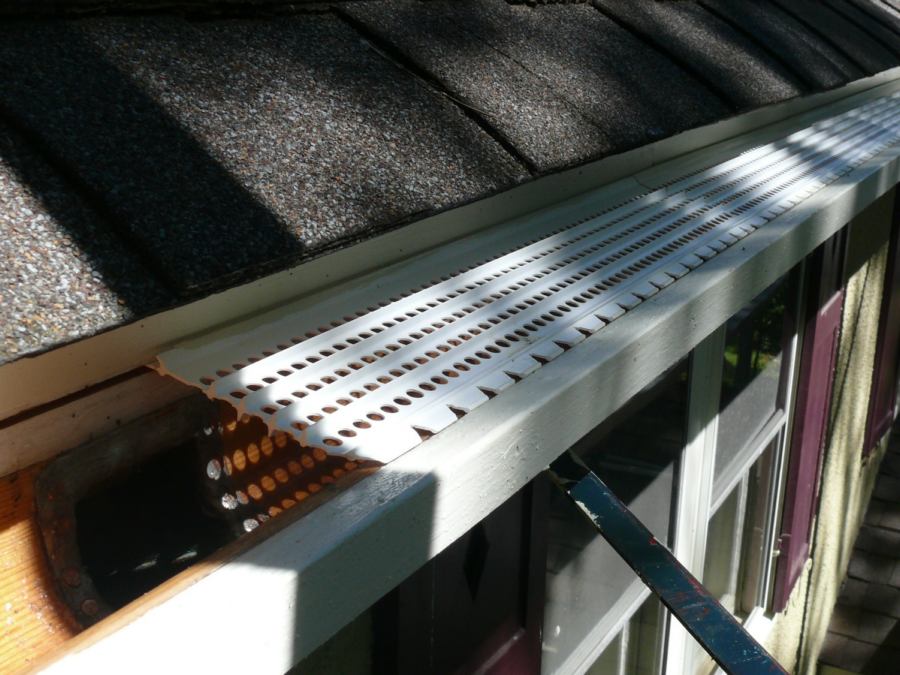
2nd story wood gutters are generally self cleaning by periodic strong winds. But this home resides under too large a canopy of trees. A guard will be a must here in helping keep these gutters clear to maintain their carrying capacity. Being this high up, everything that can be done to minimize needed maintenance is a must (as it will most likely be neglected). |
|
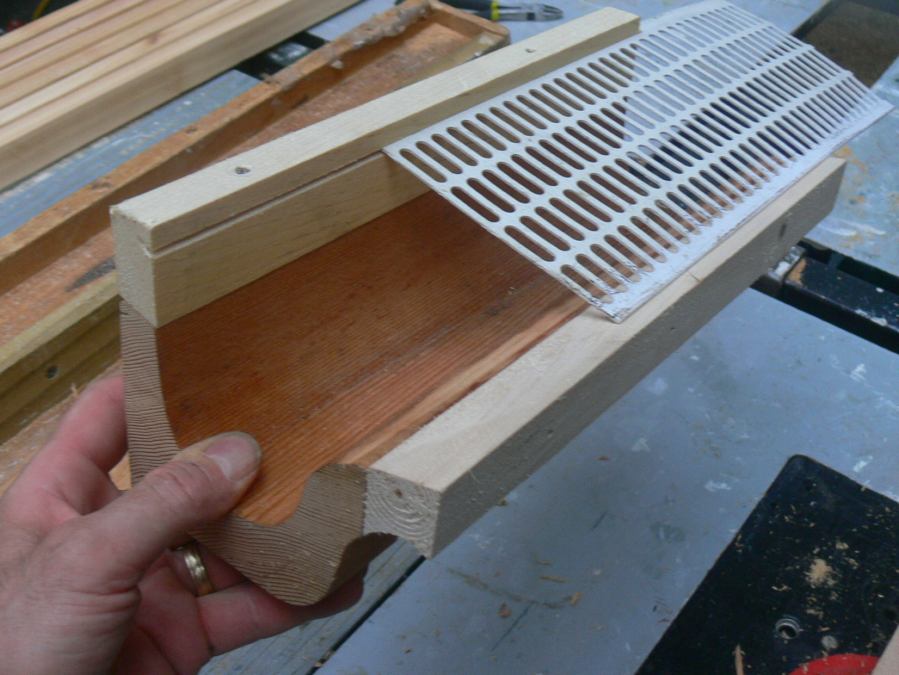
| 08
There are no store bought gutter guards that snap into wood gutters. By ripping a saw blade kerf at a 20° angle in the fascia above the back of the gutter, this vinyl guard will be held in by strong tension. The added wood nose piece gives a nice ogee profile to the wood gutter, functions as a drip edge for a wood gutter, and widens the gutter so the guard does not hang over, And best of all it will form a "drip" preventing water from drooling down the face of the gutter staining it over time. |
|
| 09
The rafter tails were also found wet from trapped moisture. They were allowed to dry out while picking up a new 41' gutter and prepping it for installation. Once dry, a wire wheel was used to remove dirt and loose wood fibers. |
|
| 10
A blast from a 160mph leaf blower while probing the older nails holes with a 4 1/2" screw finished the job. Geocel's 50yr tripolymer sealant was used to prevent these decorative rafter tails from any future wetting. |
|
| 11
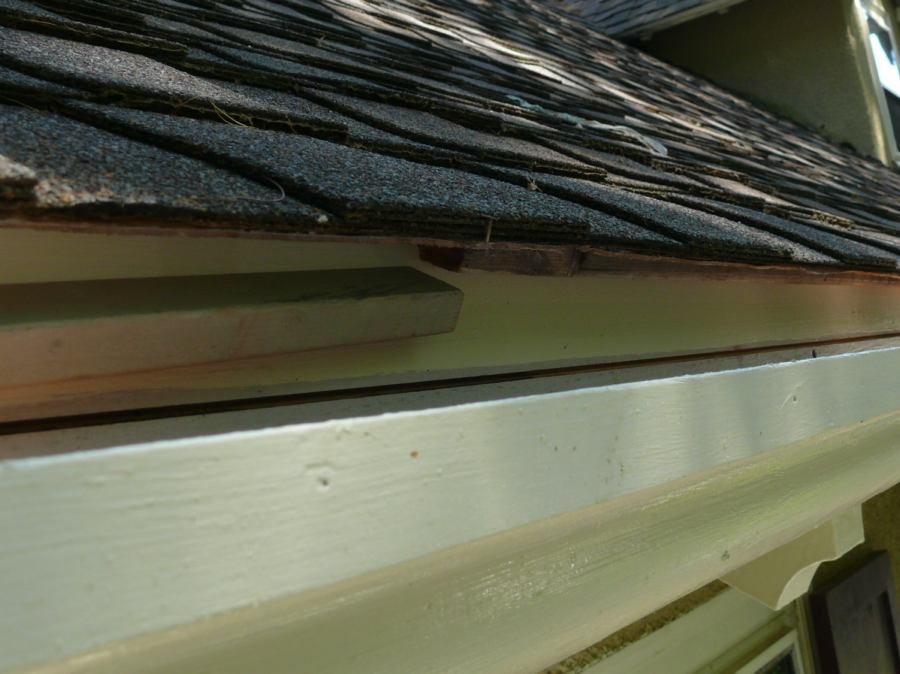
The roofers were oblivious that their 1½" nails would bulletize the underside of the exposed roof sheathing on this open overhang. With the gutter removed now is the opportune time to grind off all these nails. Look at that white aluminum dripedge that everyone uses today. If the water at the end of the asphalt shingles touches it, it will follow it. See where the water will be deposited? Right at or behind the back of the gutter. |
|
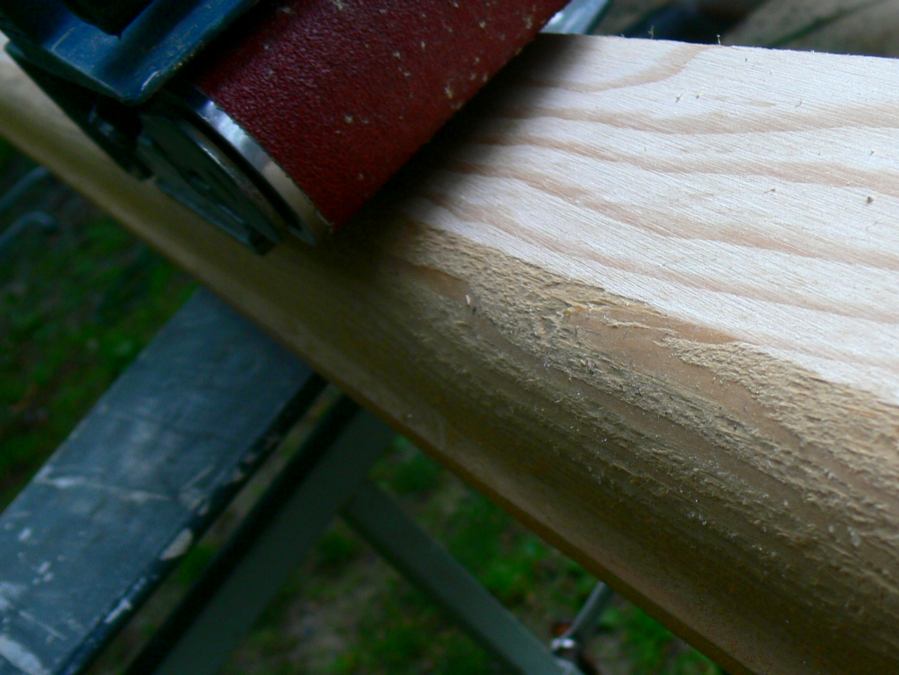
| 12
Wood gutters from the lumber yard are generally grain raised and very dirty if they have been sitting around a long time. Luckily this one was freshly milled with no checks (cracks). Sanding and dusting is the only way to guarantee the finish will adhere well and look good. A beltsander makes fast work of the flat surfaces. Old fashion hand sanding will be required for the curved surfaces. |
|
| 13
Capping the wood gutter ends with these 20oz copper end caps will ensure the decorative end rafters suffer no further water damage. These end caps were bedded in Geocel's tripolymer sealant and secured with 3/4" copper tacks. Again, rot happens where water is allowed to penetrate deeply and subsequent drying is greatly impeded. The end of the gutter I removed from this house was mush for this reason. Its end-grain was not sealed! For durability and long service-life a wood gutter's end-grain must be perfectly sealed as I'm doing here. |
|
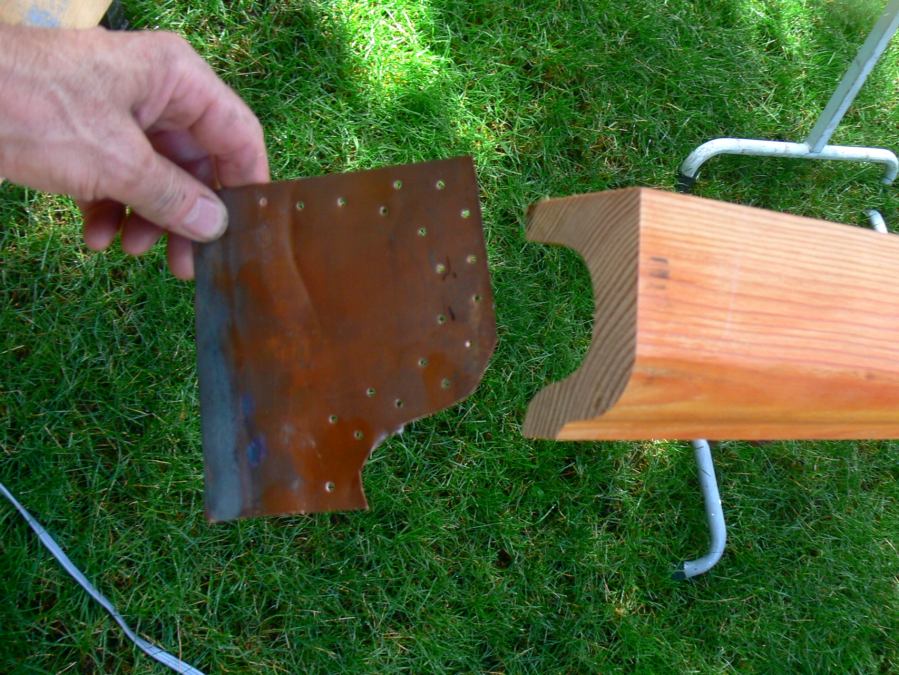
| 14
In a bygone era leaders were installed like I'm doing here, out the back. As debris collect in a gutter, leaders positioned like this cannot be covered over. Unless a gutter is full to the brim with debris, these outlets will still drain. The cutout was made on the ground with a chop saw. Notice the tight mortice making the leader's flange flush as it should be with the gutter's surface. Larger is also better in that it is more difficult to clog. A 2x3" rectangular outlet leader has almost twice the open area of a 2" round leader. Just make sure your downpiping has no 90° elbows to clog. |
|
| 15
Prior to installation this one piece, 41' wood gutter from L. Sweet Lumber Company was belt sanded (the flat areas) and hand sanded (the ogee profile and inside radius) with 40 grit cloth backed sandpaper. After a through dusting I brushed on two coats (front, back, and inside) of Geocel's clear brushable liquid rubber This wood gutter has been stored dry since it was milled and it will never get wet again. |
|
| 16
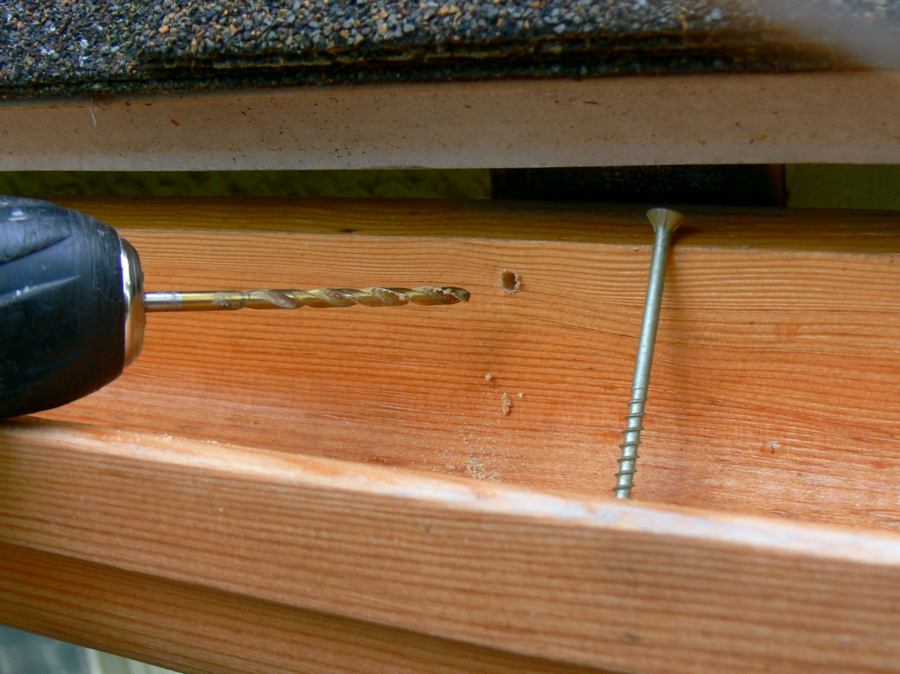
The straight grain of this Douglas Fir will spit if a fastener is just driven in. Pre-drilling and countersinking prevents this. Water enters deep into wood through cracks and becomes trapped leading to premature rot. I find its the back of the gutter that is most susceptible to rot because of the splitting from fasteners that allows the water to penetrate where it otherwise would not.. |
|
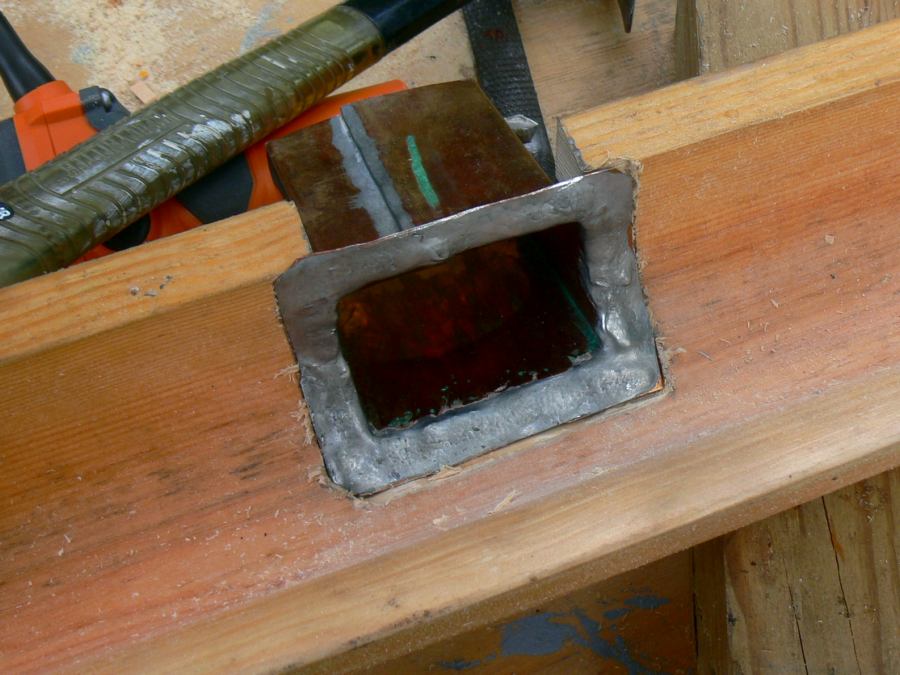
| 17
I'm installing these two custom made 2x3" copper leaders embedded in Geocel's tripolymer sealant that boasts guaranteed adhesion (click the photo). Just try getting this stuff off of anything, including your hands. Clean any surface overage, and your hands, with odorless paint thinner while the sealant is still liquid. Once it dries on your hands you'll be picking at it for days, lol. |
|
| 18
Most wood rots where there are penetrations. So pushing this sealant into this end grain provides insurance against rot should water ever get underneath this leader. If this wood gutter stays full of water and debris for years no damage will occur, I guarantee it! |
|
| 19
To cap the back of the gutter fascia boards from pre-primed finger jointed naturally rot resistant western red cedar were beveled 10° to match the bevel on the back of this wood gutter. This gives a tight seal. Notice how dirty this metal drip edge is. That implies that roof runoff follows it (see the photo below for actual proof). The purpose of today's metal drip edge is to provide support for the asphalt roofing shingles while they project an inch or so beyond the fascia. Unlike wood or slate, asphalt shingles will sag and droop without support. |
|
| 20
In the old days this upper fascia board was a 1/4" thicker with a rabbit that went over the back of the gutter and down some. I prefer to be able to visually inspect the tightness of this joint and the rabbit makes that impossible. Notice Geocel's tripolymer sealant in the joint. Water follows the metal drip edge, so by pulling it out as I've done here the water will drip directly into the gutter and not run down the fascia and over the fascia/gutter seam. |
|
| 21
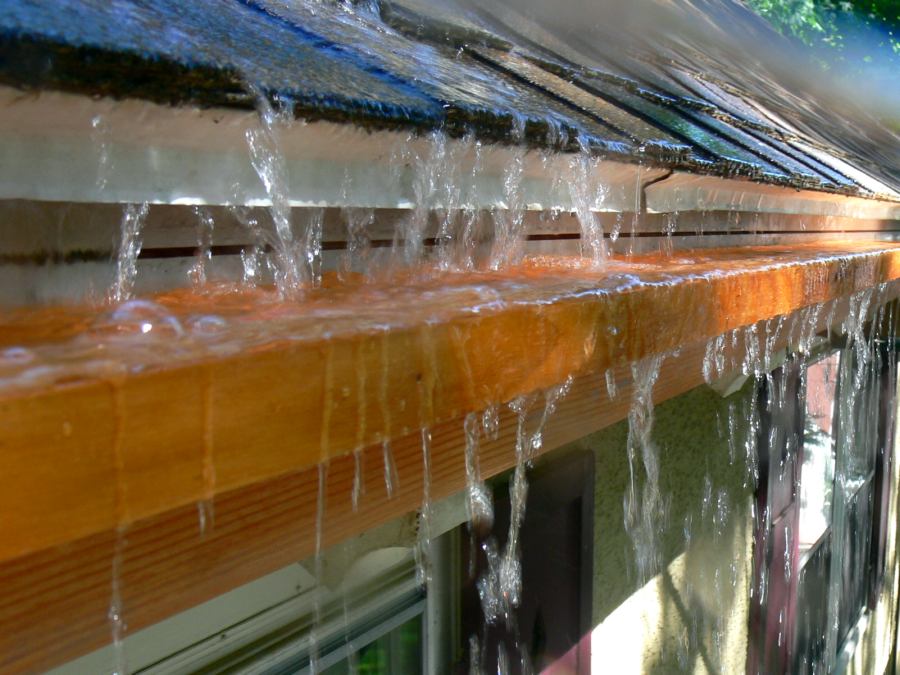
With installation complete, purposely clogging the leader outlets will test the gutter for level/pitch. The entire gutter fills with no low points. Whenever it overflows due to obstructed leaders or piping it will spill along its entire length as if the house had no gutter. It is also now apparent in this photo that the metal drip edge is still directing roof runoff to the back of the gutter, not good |
|
| 22
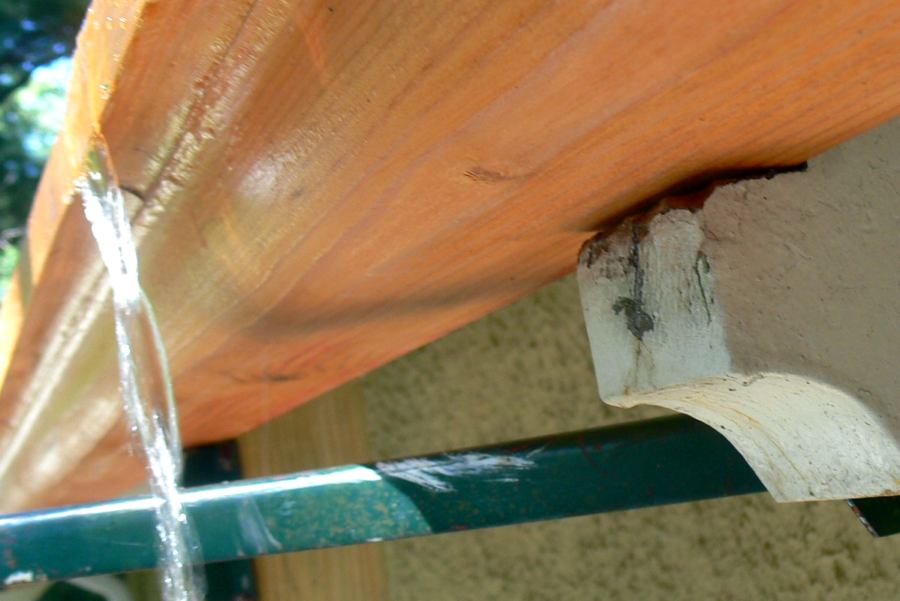
The custom wood drip added to the nose of the standard wood gutter is working as intended. Water drips clear and does not run down the face of the gutter and will therefore remain clean. Two days later the heaviest possible thunder storm was handled nicely by this 4x5" wood gutter. It did not overflow and maintained its entire length about 80% filled while the downspouts gushed like fire hoses. Those that say a wood gutter cannot hold enough water, that only aluminum gutters do, are miss guided. |
|
| 23
This part of the drip edge is basically unnecessary and is being removed. I could see this drip from the street and it wasn't pleasant to look at. Notice how clean the roof edge looks without it. I just pulled it out further to make it easier to get at with a metal grinder. Now there is nothing for the water to follow and it will drip directly from the edge of the still supported asphalt roofing into the bottom of the wood gutter. |
|
| 24
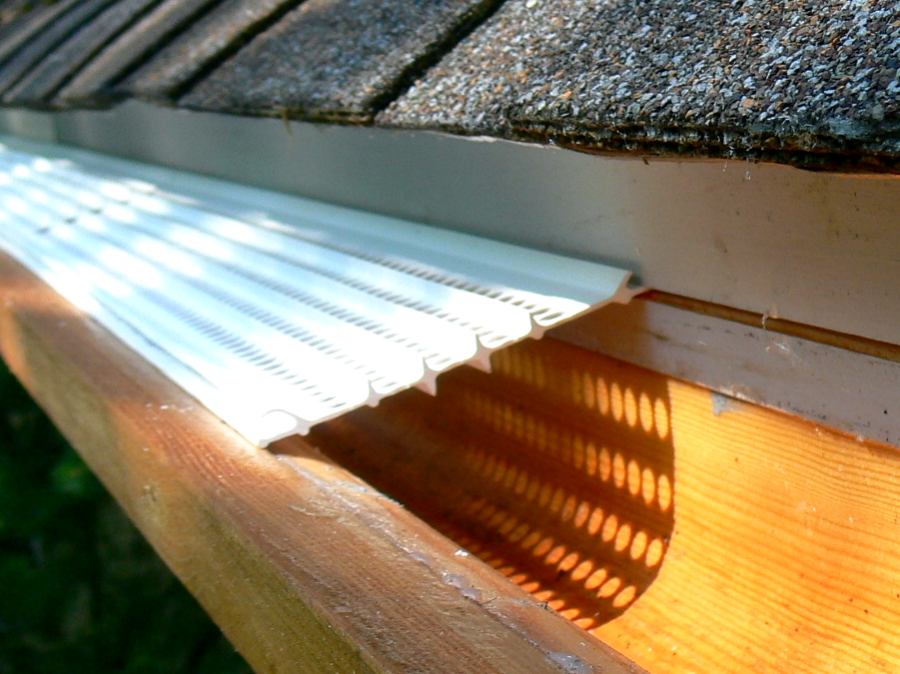
This vinyl gutter guard by Amerimax has horizontal ridges to impede the water from just flowing over it in a rain storm and off the front of the gutter. Anything that falls through these 5/16" holes will wash down the leaders in a heavy rain. What a nice clean look without that metal drip edge. This is what a slate roof projection looks like. The cut off part of the drip edge could be seen from the ground and would have become filthy over time. |
|
| 25
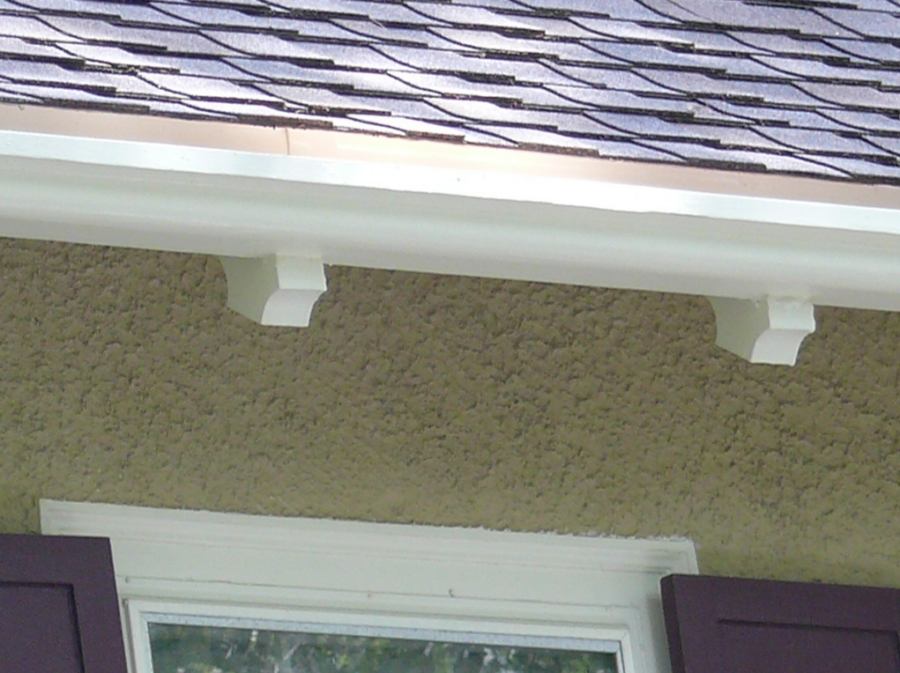
Now for the glorification, paint. First all the seams where the rafter tail ends meet the wood gutter and upper fascia were caulked to seal them form any water entry. The open soffit area was also pressure washed prior to painting. Paint does not adhere well to dirt. The underside of this decorative open overhang can be seen through the 2nd story windows. |
|
| 26
A third and final coat of Geocel's brushable clear liquid rubber. Its hard to tell if any spots are missed so being attentive and methodical helps insure complete coverage. A third coat gives added insurance and protection. |
|
| 27
A wooden drip edge beveled 30° to fit tight up to the fascia is being installed. This will keep that metal drip edge the next roofing contractor will install away from the fascia and maintain the existing overhang projection. |
|
| 28
Also, in the thunderstorm downpour I observed how the water was ponding at the front of the gutter. So cutting all these triangular notches on the tablesaw added the needed drain holes. These gutter guards were originally 5' long. I cut them in half to make them and more manageable to get them in and out for maintenance. |
|
 .
.


